


How to Face Paint - Step 5: Creating a Smooth Base Coat

The first step for almost all designs is to create a smooth base. Start by activating your face paint color as explained on our previous post using a face painting sponge like the Splash Half Moon sponge by Jest Paint.
Once you have a nice load of face paint on your sponge, gently pat the sponge against the skin making sure not to press too hard since that could hurt the individual you are face painting and it could cause for excess water to be released from the sponge and make your base coat runny. We don’t recommend for you to use swiping motions since that tends to look streakier. Pat around the area you wish to cover making sure that your base coat looks smooth and that you get a full coverage. If needed, load your sponge again and continue painting.
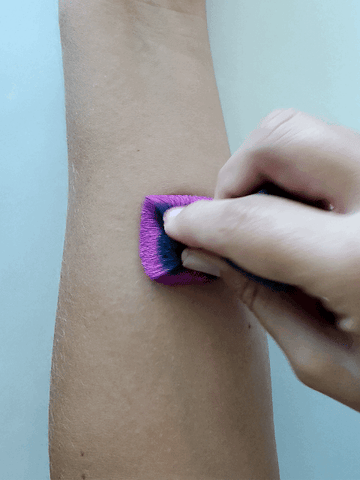
You can use the rounded edge of your sponge to smooth out any harsh lines that your sponge might have left. There is a great sponge called Droplet Sponge that has fully rounded edges so it is great for creating smooth bases with no harsh lines.
If you do not want to cover the entire face then use the edge of your sponge to shape your design. You can change the shape of your sponge by squeezing it with your fingers to the desire shape. See the cat below and how it doesn't go all the way to the edges of the face?

This design shows how sponging a smooth solid base creates a bold, beautiful design. Alternating hot and cold colors builds a lot of contrast.
You can also load two different colors at once on your sponge to create a gradient look. Simply load one color at the time and then apply the same way you would with just one color. Always keep one color towards the outside of the face and the other ones inwards. Compare loading two colors loaded on two a sponge to using a rainbow cake.
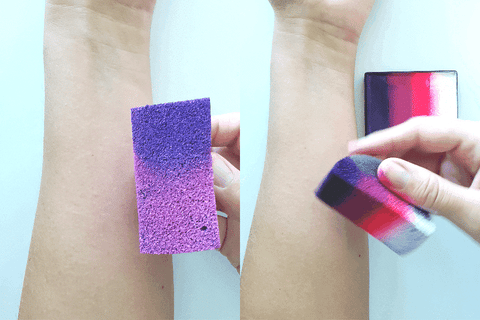
Another option is to use Rainbow Cakes to create base coats with several colors. To load a rainbow cake you will need to get your entire sponge moisten, but make sure to squeeze all excess water out of your sponge before loading it with face paint. Then, set the sponge so that the longer end of your face paint sponge is perpendicular to the stripes of your rainbow cake and swipe in the direction of the stripes back and forward until your entire sponge is fully loaded. Don’t get too stressed about using Rainbow Cakes since this is an entire technique on its own and we will go over it in a future post.

Monochrome Base for a winter cat using Frozen Shimmer by Fusion

Fusion Bright Rainbow Cake Applied with a Half Moon Splash Sponge

Beautiful Butterfly Wings sponged on by Leanne Courtney
Now, you can apply the face paint by patting on the skin with your face painting sponge. You can make vertical or horizontal movements, or move your sponge in a fan like way keeping one edge of your sponge always on the same spot while the other one rotates clockwise or counter clock wise.
Here are some charts to compare sized of sponges that we sell at Jest Paint. Small sponges work better on smaller faces or for small designs, like butterfly wings versus full face designs. Petal sponges make wing shapes.


You can also create a smooth base using a Kabuki style brush if you need to cover a large area. We will go over that on a future post.
There are a lot more of sponging techniques that can be done with different sponges but we will touch on that on a future post.
Leave a comment