What are the dimensions of this TAP Trilogy Face Painting Stencil set?
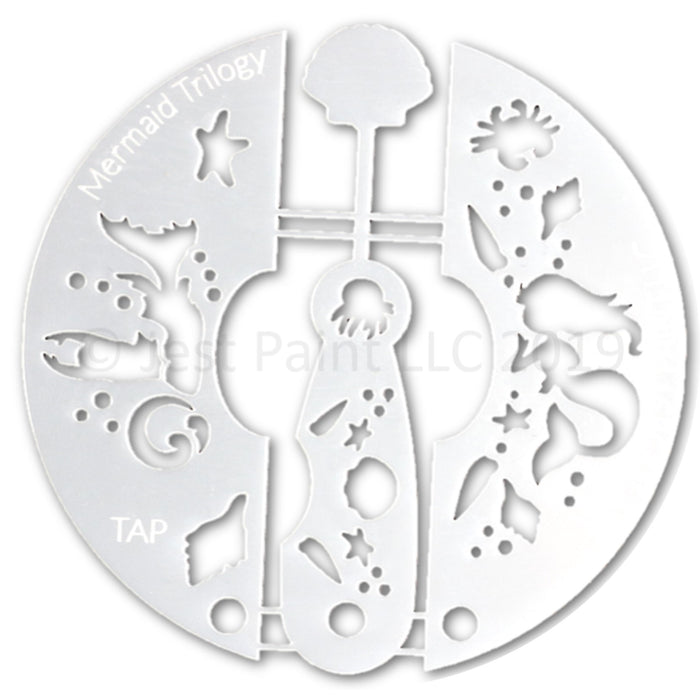
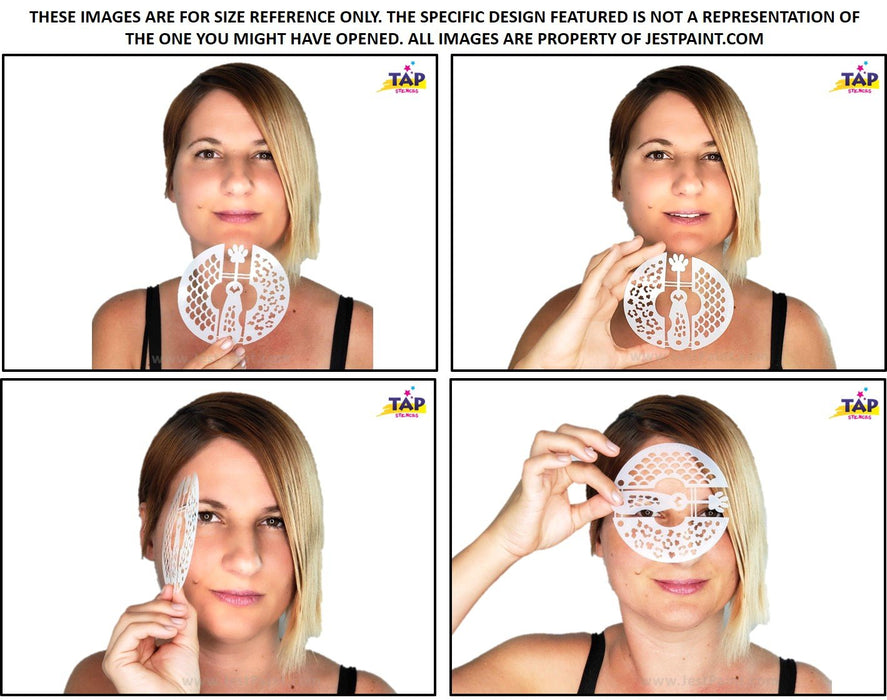
TAP Trilogy face painting stencils have a diameter of around 4.2” / 16 cm when all pieces are connected. TAP stencils are cut from a 7 mil (0,007") thick Mylar Each Trilogy stencil set consists of 3 stencils.
What is the Mermaid Trilogy TAP Stencil set best for?
TAP Trilogy Stencils, designed by Santiago Massano, are the ultimate face painting tool! The Trilogy Mermaid stencil comes in three sections that you can snip apart and use on different areas of the face and body. The Mermaid Trilogy Stencil comes with a wand stencils that you can use for a negative space clam shell design and it includes mini seashell accents in the handle. It also includes two wrap around stencils that are perfect for adding mermaids, waves and crabs and star fish around the sides of eyes or forehead. These small face painting stencils are designed to fit around children's faces and allow you to create great looking designs with little effort on your end. When using patterns, you can move the stencil around to cover all of the desired area, don’t get tricked by their size, you can cover a full face with them if you keep on moving the stencil! The flexible material, rounded corners and c shape allow the stencil to curve with the shape of the face and fit in any desired area without any inconvenience.
How to use Trilogy TAP Face Painting Stencils?
Body Art stencils require some practice to learn how to use them properly, but once you learn how to use them you can get through your face painting line much faster!
You can use them to create very simple designs by just stamping the design featured on the stencil, or you can use them to enhance more intricate face painting designs and add textures or more detailed work to your creations.
Start with a clean stencil and make sure that the skin is nice and dry before you apply the stencil, otherwise the face paint will look runny. Apply the TAP Stencil against the skin and hold it firmly using the tabs provided.
Now is the time to apply the face paint. The best option is to work with pressed powders as they won’t bleed under the stencil. Load a smoothie or velvet blender with some powder and tap over the stencil gently until you have covered the desired area. If you use a primer underneath, like glycerin, Vaseline or just regular face paint, the powders will stick better. If you rather work with water activated face paints, we strongly suggest using a glycerin based paint like Superstar or Paradise. Get your sponge very slightly wet and work the paint into a creamy almost dry consistency. You want to make sure to always work with the least amount of water possible to prevent the paint from bleeding under your face painting stencil. Test the paint on the surface of your hand to make sure it isn’t too wet, and then tap over the surface of the stencil. Always move from the edges of the stencil into the design, so you are not pushing face paint under the stencil.
Using sponges with very small pores is best since they provide a more even coverage and they tend to hold less water. Some people also like to use kabuki style brushes with their stencils, just make sure the brush has a very thin load of paint and it is fairly dry. If you need to cover a larger area of the face you can gently move your stencil as you paint, making sure not to lay the stencil over a freshly painted area, so not to smudge the design underneath.
Once it is time to remove the stencil, let go of one of the tabs, and with your free hand pick the stencil and move it away from the face, making sure not to drag the stencil against the freshly painted area to prevent smudging. Before you use that stencil again, make sure to clean it and let it dry so it doesn’t ruin your next design. Before your first event using stencils make sure to practice painting with them a few times. You will see how quickly you can learn and start getting creative with them.
How to Store my TAP Stencils?
All body art stencils are delicate tools and require lots of care to make sure you can use them for years to come. Before storing them make sure they are clean. Put the stencil under a gentle stream of water and then use a clean towel to softly wipe the surface of the stencil on both sides. Use gentle movements, so not to bend any parts of the stencil. You can remove stubborn stains with some soap. Pat the stencils dry using a towel and put them away.
Many professional face painters store them using a snap ring and putting them in an area of their kit where they won’t get damaged. You can store them inside a little case, or you can use a photo album or trading cards album to separate them and make them easier to find. Many artists stick tiny pieces of Velcro on one tab and let them hang from a Velcro strip in their kit, or use the holes to hand them on a peg/pin board.
What Else Should I know about TAP Stencils?
TAP Stencils are manufactured in the USA and each pattern is designed by hand by Anna and Santi from Jest Paint. All of the designs featured on our stencils are original and are copy righted by Jest Paint LLC. The stencils are packed inside a bag by our packers in the USA and we use recycled card-stock for the instructions card that comes with our stencils.
¿Cuáles son las dimensiones de este conjunto de plantillas TAP Trilogy?
Las plantillas TAP Trilogy tienen un diámetro de alrededor de 4.2 "/ 16 cm. cuando todas las piezas están unidas. Las plantillas TAP se cortan de un Mylar de 7 mil (0,007") de espesor 0,18 mm. Cada conjunto de plantillas Trilogy consta de 3 plantillas.
¿Para qué es mejor Mermaid Trilogy TAP Stencil?
¡Las plantillas de trilogía TAP, diseñadas por Santiago Massano, son la mejor herramienta para pintar caras! Trilogy Mermaid viene en tres secciones que puedes separar y usar en diferentes áreas de la cara y el cuerpo. Mermaid Trilogy Stencil viene con una plantilla de varita que puedes en negativo para diseños de almeja, también incluye pequeños detalles de concha marina en el mango. Incluye dos plantillas envolventes que son perfectas para agregar sirenas, olas, cangrejos y estrellas de mar alrededor de los ojos o la frente. Estas pequeñas plantillas están diseñadas para ajustarse a las caras de los niños y te permiten crear diseños de gran apariencia con poco esfuerzo de tu parte. Cuando use patrones, puedes mover la plantilla para cubrir toda el área deseada, no te dejes engañar por su tamaño, ¡puedes cubrir una cara completa con ellos si continúas moviendo la plantilla! El material flexible, las esquinas redondeadas y la forma en C permiten que la plantilla se curve con la forma de la cara y se adapte a cualquier área deseada sin ningún inconveniente.
¿Cómo utilizar las plantillas Trilogy TAP?
Las plantillas de Body Art requieren un poco de práctica para aprender a usarlas correctamente, pero una vez que aprendas cómo usarlas, ¡puedes cruzar la línea en tus trabajos y hacerlo mucho más rápido!
Puedes usarlas para crear diseños muy simples solamente estampando el diseño presentado en la plantilla, o puedes usarlos para mejorar diseños más intrincados y agregar texturas o detalles a tus creaciones.
Comienza con una plantilla limpia y asegúrate de que la piel esté en condiciones y seca antes de aplicar la plantilla, de lo contrario, la pintura se verá líquida. Aplica la plantilla TAP contra la piel y sostenla firmemente con las pestañas de los bordes.
Ahora es el momento de aplicar la pintura. La mejor opción es trabajar con polvos prensados ya que no se filtraran debajo de la plantilla. Carga un pincel difuminador con un poco de polvo y golpea suavemente la plantilla hasta que hayas cubierto el área deseada. Si usas una imprimación debajo, como glicerina, vaselina o simplemente pintura facial regular, los polvos se adherirán mejor. Si prefieres trabajar con pinturas faciales activadas con agua, te recomendamos utilizar una pintura a base de glicerina como Superstar o Paradise. Humedece tu esponja ligeramente y trabaja la pintura en una consistencia cremosa casi seca. Debes asegurarte de trabajar siempre con la menor cantidad de agua posible para evitar que la pintura se filtre debajo de la plantilla. Prueba la pintura en la superficie de tu mano para asegurarte de que no esté demasiado húmeda y luego golpea sobre la superficie de la plantilla. Muévete siempre desde los bordes de la plantilla hasta el diseño, de modo que no empujes la pintura facial debajo de la plantilla.
El uso de esponjas con poros muy pequeños es mejor ya que proporcionan una cobertura más uniforme y tienden a retener menos agua. A algunas personas también les gusta usar pinceles de estilo kabuki con sus plantillas, solo asegúrate de que el pincel tenga una carga muy delgada de pintura y que esté bastante seco. Si necesitas cubrir un área más grande de la cara, puedes mover suavemente tu plantilla mientras pintas, asegurándote de no colocar la plantilla sobre un área recién pintada, para no manchar el diseño debajo.
A la hora de quitar la plantilla, suelta una de las pestañas, y con su mano libre quita la plantilla y aléjela de la cara, asegurándote de no arrastrar la plantilla contra el área recién pintada para evitar manchas. Antes de volver a usar esa plantilla, asegúrate de limpiarla y dejarla secar para que no arruine tu próximo diseño. Antes de tu primer evento con plantillas, asegúrate de practicar pintar con ellas varias veces. Verás qué tan rápido puedes aprender y comenzar a ser creativo con ellas.
¿Cómo almacenar mis TAP Stencils?
Todas las plantillas de arte corporal son herramientas delicadas y requieren mucho cuidado para asegurarse de que puedas usarlas en los próximos años. Antes de guardarlos, asegúrate de que estén limpias. Coloca la plantilla bajo un chorro suave de agua y luego usa una toalla limpia para limpiar suavemente la superficie de la plantilla en ambos lados. Usa movimientos suaves, para no doblar ninguna parte de la plantilla. Puedes quitar las manchas difíciles con un poco de jabón. Seca las plantillas con una toalla y guárdalas.
Muchos pintacaritas profesionales los almacenan usando un anillo de retención y colocándolos en un área de su kit donde no se dañarán. Puedes almacenarlos dentro de una pequeña caja, o puedes usar un álbum de fotos para separarlos y hacerlos más fáciles de encontrar. Muchos artistas pegan pequeños pedazos de velcro en una pestaña y los dejan colgar de una tira de velcro en su kit, o usan los agujeros para colocarlos en un tablero de clavijas.
¿Qué más debo saber sobre TAP Stencils?
Las plantillas TAP se fabrican en los EE. UU. Y cada patrón está diseñado a mano por Anna y Santi de Jest Paint. Todos los diseños presentados en nuestras plantillas son originales y están protegidos por Jest Paint LLC. Las plantillas se empacan dentro de una bolsa en los EE. UU. y usamos cartulina reciclada para la tarjeta de instrucciones que viene con nuestras plantillas.