


Quick and Easy Step by Step Face Painting | Rainbow Cat
Follow these easy steps below to learn how to face paint a Rainbow Tiger in no time. Anna Wilinski has created these Quick & Easy Face Paint Guides so that beginner face painters can follow them at home and practice new and exciting face painting designs.
First time getting into face painting? No worries, check our How to Activate Face Paint blog post for an in depth explanation on how to load your tools and get the proper consistency for your paint.
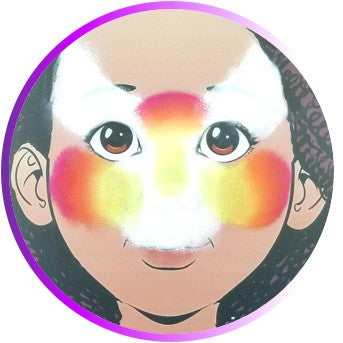
Step 1 of your Rainbow Cat
Pick up your Sparkling Faces practice board and a face painting sponge and load it with white face paint. Anna used Fusion Body Art Paraffin White but you can use any white face paint you have at home already. Create a Y shape over the face going over the eye lids and eyebrows towards the hairline and down over the nose and upper lip area.
Not sure how to use a face painting Sponge? Don't worry! Check our How to Use a Face Painting Sponge blog for a more in depth explanation.
Then load your sponge with the one side of Fusion Body Art Rainbow Joy rainbow cake. Anna chose to pick the warm colors first to go over the cheeks and the nose and area between the eyes.
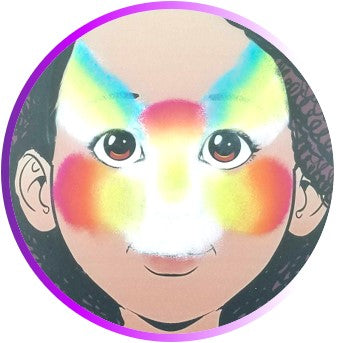
Step 2 of your Rainbow Cat
Pick up your sponge and load it with the cold colors of the same Rainbow Cake to go over the eye lids, eyebrows and into the hairline just like pictured below.
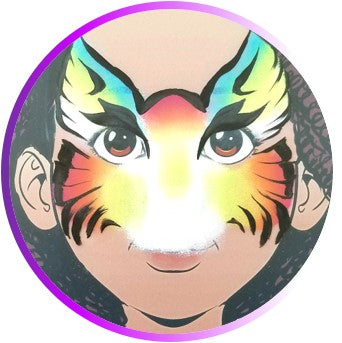
Step 3 of your Rainbow Cat
Pick up an angled face painting brush that is small enough to do line work with, Anna used our Bolt Brush - New Small Short Firm Angle (1/4") to do it, and load it with black face paint (Anna used Fusion Body Art Strong Black).
Not sure how to use a face painting Sponge? Don't worry! Check our How to Use a Face Painting Brush blog for a more in depth explanation.
Outline the edges of the design you created with your sponge keeping in mind that the angle at which you press the brush against the face and the amount of pressure you out will determine how thick or thin your lines will be. It is best to play and go from thin to thick to thin to give your line work more dimension.
Step 4 of your Rainbow Cat
Using a round face painting brush loaded with black face paint create the nose, the little whisker dots on the muzzle area and the bottom lip. Fill in the bottom lip with a pink or magenta color.
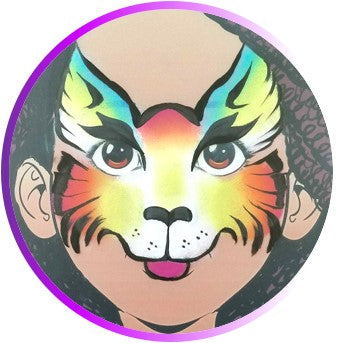
And this is it! You are now able to create a cute looking rainbow cat face painting design! Keep practicing until all of the steps come to you naturally without having to look at this guide. Don't forget to leave a comment if you like the post or if you have any questions and check the supplies used if you want to match the design created by Anna. Check the related posts below for other great face painting blog posts.
Looking into more learning opportunities? Check our YouTube channel for more free step by step tutorials or enroll at the International Face Painting School and become a professional face painter!
Leave a comment