What am I receiving when I order the Glimmer Glitter Tattoo Stencils BEST of Glimmer Collection?
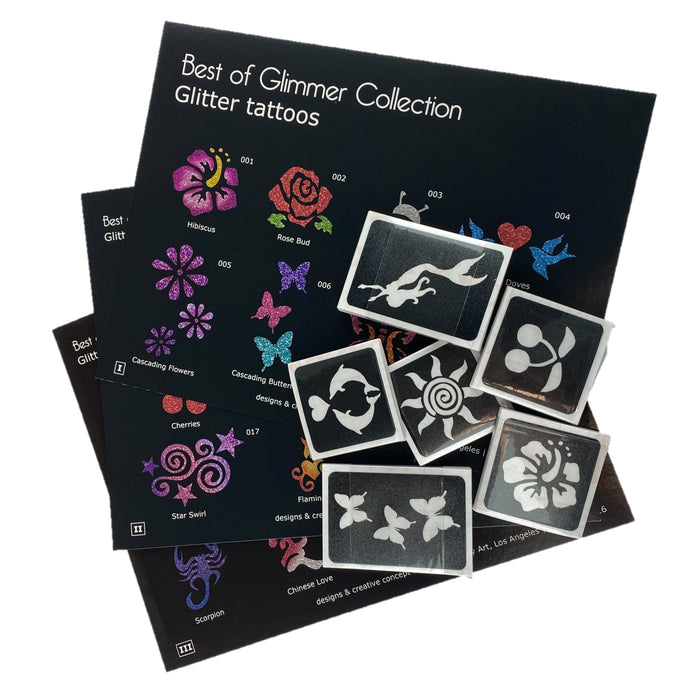
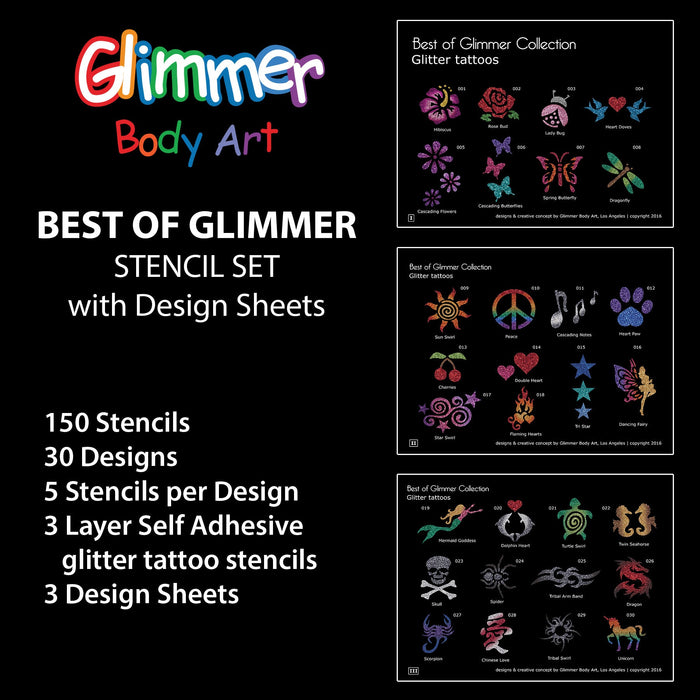
This Glimmer Body Art BEST OF GLIMMER set contains a total of 150 stencils of 30 of the most popular glitter tattoo stencil designs (5 of each design) with 3 laminated display sheet to show them all off. This set has a variety of the most popular designs, so there will be an awesome tattoo stencil for everybody. From hearts to dragons, flowers to skulls, kids and adults will love these glitter tattoos! To see all of the different designs, view product photo above.
How do I apply glitter tattoo stencils?
First you’re going to need to prep the skin by having the area gently washed with soap and water, if they have recently used any type of lotion on their skin, make sure to wipe it down well with rubbing alcohol. Let the skin fully dry and then carefully remove the paper layer from the stencil, and place it on a smooth skin surface that contains little to no body hair. Avoiding excess body hair will make your design look better, and will be easier to remove. Glitter tattoos for kids last longer when you put them on areas of the body that they might be less tempted to pick at, like down by the ankle or on the upper arm. Those areas often have less body hair too. Using your hand or something firm (a business card works well), rub the stencil onto the skin so that there aren’t any gaps or air bubbles between the skin and the design. Peel off the top clear layer slowly. Watch for floating pieces, and grab those with your fingernail to make sure that they don’t come up with the clear layer. If you are hoping for a speedy application, you should avoid complex designs with floating pieces. Cover the empty area of the stencil with a thin layer of cosmetic grade body glue. Keep in mind that if you put it on too thick it will take a long time to dry; however if you accidentally do this you can press the design with the clear layer to lightly pick up excess glue. Peel off the stencil carefully, making sure not to tug on any drying glue. If there are floaters (the smaller stickers that aren’t connected to the rest of the stencil design) you can use a wood stick or tweezers to pick them out carefully. Using a brush or a poofer cover the stencil with a thin layer of glitter. You can use just one color, or use a lot of colors. Just remember that the more colors that you add, the longer it will take to create the design. Brush the excess glitter off into a tray. O-o-o-h! and a-h-h-h! at the new sparkly creation that is sure to make your clients super mega happy!!
What else should I know about the Glimmer Glitter Tattoo Stencils?
After application, depending on how you care for your glitter tattoo it should last about 1-7 days. If you wish for your temporary tattoo to last longer, avoid friction, hot tubs, chlorine and soap. Feel free to contact us if there are any new stencils you wish to see that you haven’t yet been able to find on our website
¿Qué recibo al pedir las Plantillas para Tatuajes con Purpurina Glimmer:
LO MEJOR de la Colección Glimmer?

Este set Glimmer Body Art: LO MEJOR DE GLIMMER contiene un total de 150
plantillas de 30 de los diseños más populares (5 de cada diseño) con 3
hojas laminadas para exhibirlas todas. Este set incluye una variedad de
los diseños más populares, así que habrá una plantilla increíble para
todos los gustos. Desde corazones hasta dragones, flores y calaveras,
¡a niños y adultos les encantarán estos tatuajes con purpurina! Para ver
todos los diseños, consulta la foto del producto arriba.
¿Cómo aplico las plantillas para tatuajes con brillantina?

Primero, prepara la piel lavando suavemente la zona con agua y jabón. Si
se ha aplicado alguna loción recientemente, límpiala bien con alcohol
isopropílico. Deja que la piel se seque por completo y luego retira con
cuidado la capa de papel de la plantilla y colócala sobre una superficie
lisa que tenga poco o nada de vello. Evitar el exceso de vello mejorará
el diseño y será más fácil de eliminar. Los tatuajes con brillantina para
niños duran más si se colocan en zonas del cuerpo donde no se sientan tan
tentados a tocarse, como el tobillo o la parte superior del brazo. Estas
zonas también suelen tener menos vello. Con la mano o algo firme (una
tarjeta de visita funciona bien), frota la plantilla sobre la piel para
que no queden huecos ni burbujas de aire entre la piel y el diseño.
Retira lentamente la capa transparente superior. Presta atención a los
trozos que queden sueltos y sujétalos con la uña para asegurarte de que
no se desprendan de la capa transparente. Si busca una aplicación rápida,
evite diseños complejos con piezas flotantes. Cubra el área vacía de la
plantilla con una fina capa de pegamento cosmético. Ten en cuenta que si
lo aplicas demasiado grueso, tardará mucho en secarse; sin embargo, si
accidentalmente lo haces, puedes presionar el diseño con la capa
transparente para recoger ligeramente el exceso de pegamento. Retira la
plantilla con cuidado, asegurándote de no tirar del pegamento que se está
secando. Si hay flotadores (las pegatinas más pequeñas que no están
conectadas al resto del diseño de la plantilla), puedes usar un palito de
madera o pinzas para sacarlos con cuidado. Con un pincel o un
desmaquillador, cubre la plantilla con una fina capa de brillantina.
Puedes usar un solo color o muchos colores. Solo recuerda que cuantos más
colores agregues, más tiempo tardarás en crear el diseño. Cepille el
exceso de brillantina en una bandeja. ¡O-o-o-h! ¡y a-h-h-h! ¡en la nueva
creación brillante que seguramente hará a tus clientes súper felices!
¿Qué más debo saber sobre las plantillas para tatuajes con brillantina
Glimmer?

Después de la aplicación, dependiendo del cuidado que le des a tu tatuaje
de brillantina, debería durar entre 1 y 7 días. Si quieres que tu tatuaje
temporal dure más, evita la fricción, los jacuzzis, el cloro y el jabón.
No dudes en contactarnos si quieres ver alguna plantilla nueva que aún no
hayas encontrado en nuestra web.