


TAP 024 Face Painting Stencil - Spider Web
10+ In Stock!
Face painting with stencils represents a challenge to some while others think it is simply cheating. Here at Jest Paint, we think of stencils as a tool to enhance your work, to help you work faster when you need to, to help you add intricate details to a design so that it stands out, and to help you accomplish shapes and textures that are otherwise very hard to do free hand.

The intention of this guide is to show you how to use face painting stencils in a way that they won't be seen by others, or by you, as cheating, but rather as a tool for specific purposes. We will also guide you through the huge variety of stencils available out there and recommend a few of our top choices and must-have stencils so that if you are just starting out with stencils you can get yourself a nice set that will get you through most gigs.
Keep reading to find the many uses of face painting stencils, find different techniques, some tricks, and the top stencils that we like to recommend to every face painter.
Using stencils requires some practice, although they can look like an easy-to-use tool, the truth is that you will need to practice a little before you can get a good print. The most common issues with stencils are moving your stencil while you are applying the paint, or the paint being too wet and getting under your stencil. We will cover a few important things that you need to know in order to get a perfect stencil print.
Although you might have read a little bit about this topic in our Ultimate Face Paint Guide blog post, we will cover some extra ground in this post.
"Using the right tools is the most important thing when painting with stencils, if you get the wrong paint or applicator, your stencils won't come out right"
When choosing a kind of face paint to use with stencils you have a few options. You can use a Glycerin Based face paint like Superstar or Paradise, you can use powder-based face paints like Starblend, or you can use airbrush face paint with an airbrush compressor and an airbrush gun, like Vibe.
"Don't forget to check our How to Activate Face Paint blog post for more detailed information about it."
Using Glycerin based face paints is great because you can get a very creamy load that won't bleed under your stencil. Wax-based face paints tend to have a thinner consistency and they can bleed under your stencil. With the right technique, you can make almost any paintwork, but glycerin-based paints will make it a bit easier.
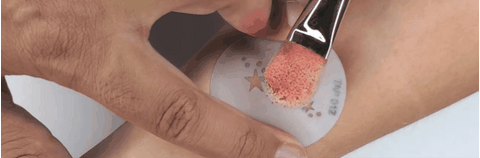
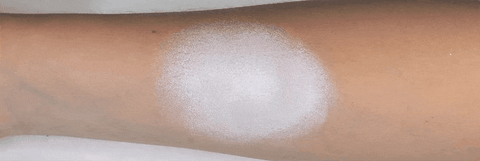
Using Powder based face paints is another great option. Powders have the great advantage that will not bleed at all under your stencil, but if you cake the powder too thick there will be some fall out when you remove the stencil. Also, when using powders you might need to use a primer first so that the powder sticks better to the skin. You can use face paint, glycerin, or lotion as your primer. Use just a tiny bit, all you need is for the skin to be slightly tacky so the powder sticks.
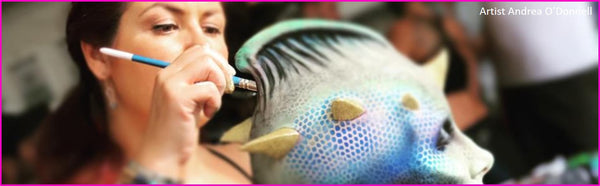
Using airbrush-style face paints with an airbrush gun and a compressor is a third and very popular option. This is a common option if you are stenciling a full face, doing airbrush tattoos, or even if you are adding textures to a body painting design. Follow the paint manufacturer's instructions in regards to the right PSI for the paint, so that you work with the right air pressure.
This is really a matter of choice, but we will give you a few tips on good stencil applicators and why we like them.
If you are working with water-activated face paints then using a kabuki brush or a small pore sponge (like a latex-free makeup sponge) is a great idea. Either one tends to create fewer issues with bleeding than regular face paint sponges. You can use a regular face paint sponge but you have to make sure it is extra dry.
"Check our How to Use a Face Painting Sponge blog post for more information on sponges and how to use them."
One of our favorite sponges for stenciling is the Splash Droplet Sponge because it has very small pores and a rounded edge that makes it easy to get a nice even print.
Another great option, if you are working with powders, is a smoothie blender or velvet blender applicator. They are great because they are small enough to be able to choose what areas of the stencil to use and which ones not to, and they are very sturdy so you can press hard enough to get a good print.
If you are using liquid face paints then using an airbrush gun and a compressor might be your best option. Just make sure not to have the pressure too high and to work far enough from the stencil itself so that paint is not pushed under it.
Having the right technique is just as important as using the correct paint and the correct applicator. There are a few very important things you need to keep in mind when using face painting stencils.
Make sure to press the stencil against the skin firmly at all times. If the stencil is large and you can't hold the entire stencil down at once, make sure to keep pressure around the area you are applying the paint and as you need to reach for other areas of the stencil walk slowly with your fingers to keep the stencil from shifting.
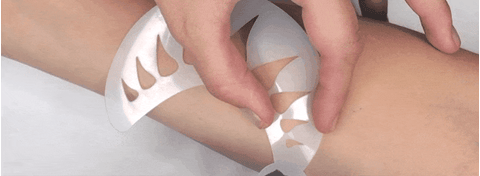
Always make sure to use a clean and dry stencil. If your stencil is wet or it has paint on the bottom, it will likely smear or stain the design underneath.
If using an airbrush, keep a good distance from your stencil so that the paint is not pushed under the stencil, but not too far that you will get over-spray. Don't try and get a solid coverage at once, move your airbrush back and forward over the stencil area until you get the opacity you want.
If using a sponge or brush, make sure to always paint inwards, from the edges in, rather than outwards, so that you don't force paint under the stencil. Use slow and gentle moves. You can gently pat the skin if you are using a sponge, or move your brush in a circular motion if you are using a kabuki-style brush.
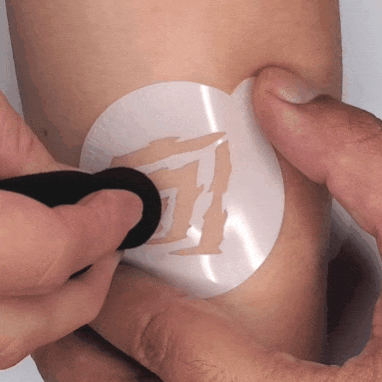
In this case, it is also important to make sure the paint is almost dry. Before applying the stencil test the sponge or brush on your skin. It should feel almost dry and tacky. If your sponge or brush has too much water, squeeze all the water out, or go over a dry towel with the brush or sponge to remove excess water.
If you are using a smoothie blender with dry powders, then make sure to get a good load of powder on your smoothie, but not too thick that it would create fall out. Make slow and firm short strokes with your smoothie over the stencil to get the powder to stick to the skin. Remember, using a primer is recommended when working with powders.
As we mentioned at the beginning, there is a lot that can be done with stencils and the only limit is your imagination. We will cover the main things that most face painters do when using stencils, but you can come up with your own ideas once you learn how to use them.
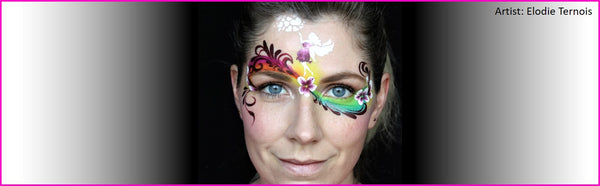
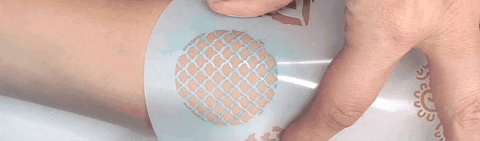
There are many stencils that have different textures, like animal prints, squares, circles, lines, and more. These are great for adding textures to your butterfly wings, tiger faces, lizard and monster faces, etc.
These textures make your design stand out and look extra detailed while not a lot of extra work is required to get there.
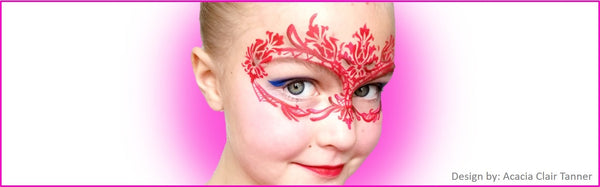
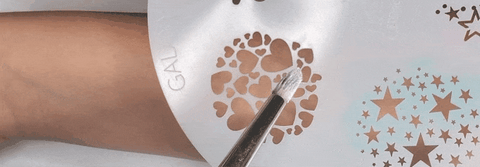
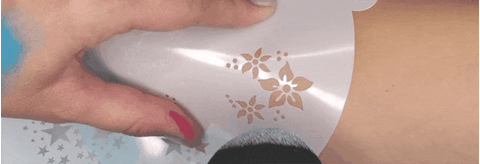
Sometimes you just want to add some cute stars, hearts, or flowers to a design, by the edge of it, or by the corner of the eye.
Stencils can be very handy for that since they give you a fast way of adding a cute detail that looks sharp and stands out. You can check out some cute flower stencils in our shop.
Sometimes you just need to bust through a face painting line or paint something quick in a little one that won't stop moving. Cheek-art style stencils are perfect for that, they look cute and intricate enough yet they are super easy to apply.

You can visit our animal stencils section for some ideas.
Many artists working at festivals like to do full-face designs using full-face stencils and an airbrush. This is a great way of making fast yet great-looking designs, which is ideal in a festival setting if you are getting paid by the face. Using full-face stencils also allows you to have uniformity. Sometimes you have a group of 3 or even 6 artists working at the same booth and people expect the same quality of work regardless of the artists that end up doing their face. So, having full-face stencils is a great way of achieving that without hours of training to match a particular style of painting.

ShowOffs has an entire line of full-face - face painting stencils that is great for this kind of situation.
Another great option for festivals is airbrush tattoos. Airbrush tattoos are very popular with all ages, and they can easily be done with an airbrush compressor and an airbrush gun.
You can choose to do simple check-art style designs on the upper arm, hand, or face, or go with the more realistic style tattoos using stencils like the ones by Tattoo Pro.
Using face painting stencils doesn't always have to mean putting a stencil against the skin and painting over it. There are many fun things that you can do with your stencils if you want to. Below are some ideas.
You can actually paint your stencil surface with just a little bit of paint and press the stencil against the skin, leaving the reverse stencil print. This is a fun and different way of using your stencil.
If you set your stencil and make a first print with white or light-colored face paint and then move the stencil just a tiny bit, and then add a second layer of a darker color of face paint, you can create a 3D look. Just make sure that before you move the stencil the paint is dry, and make sure to just move it a little bit.
You can create an airbrush effect without using an actual airbrush. The way to do this is by making sure that one half of the stencil is darker and more opaque than the other end. If you just barely get paint on the one end of the stencil then it will look like an airbrush fade-out look.
If you want to create an extra sparkling look you can actually add glitter to your stencil work. The first thing is to make a stencil print with regular face paint, then, while the paint is still wet and without moving the stencil, load a sponge or brush with some cosmetic grade glitter that matches the color of the paint you used and press the glitter on to the paint through the stencil. Then, carefully remove the stencil and you will get an awesome glitter stencil look!
This is another fun technique, and it is pretty much the opposite of stenciling, in a way. What you do is first paint your design and then, if you want to add some negative space with a texture, you can set a stencil over the design and press it against the skin. Then, using a slightly (very slightly) moisten sponge, wipe the paint off through the stencil and remove the stencil. This will leave a pattern on your design, but instead of it being made of color, it will be done with your skin color as your skin will now be showing.
Having an easy-to-use setup for your stencils is very important or you just won't use them. There are a few different ways that people do this:
- Attach a little Velcro dot to your stencil and attach each stencil to a Velcro strip on your face painting case.
- Attach a little magnet to your stencil and attach each stencil to a magnetic or metallic strip on your face painting case.
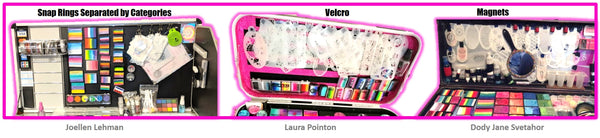
- Use a snap ring to hold your stencils separated by category, that way when you need one you only need to pick one set and look through it rather than looking through all of your stencils.
- Keep them in a coupon organizer (accordion style), or in an album like the ones made for trading cards. You can use one slot for each stencil and that way you can find them easily without going through hundreds. You can label each page so you know what stencils are in each one.
- Cut a pool noodle in half so one side is flat and cut it to the length you want it to be. Then make some slits on the pool noodle so that you can insert a piece of your stencil.
These are just some ways we have seen people use to set their stencils while painting, you can share yours by leaving a comment at the bottom.
Storing your stencils in a way that they won't get damaged is crucial. Although face painting and airbrush stencils are fairly durable, they can bend or little pieces can get caught on to something and your stencil might get damaged.
It is important to store your stencils in a way that they won't be in contact with anything that could damage them. You can use a small pencil case, the trading cards album we talked about before, the coupon organizer, etc.
But before you store them we suggest you clean them well so that they are ready when you need them at your next event. To clean your stencils you can submerge them in water with soap (we recommend using Lush Brush soap) for a little while or put them under the tap and gently rub the stencil between your fingers to get all of the paint off. Then, gently set the stencil over a paper towel and tap another paper towel on top so that it dries out. Do not try and wipe them off because you might damage small pieces of them. It is always better to just press it in between two pieces of a paper towel or a soft cloth on a flat surface.

If you used alcohol-based face paints then you will need to clean your stencils with alcohol, 99% alcohol being your best option. You can also try with soap and water if you let them sit in a soapy water solution for a while.
Choosing our top 20 best face painting stencils is not an easy task since we have literally hundreds of stencils to choose from and we carry more than 100 in our own kit, so by no means this list shows the only stencils you should have, but rather our top choices based mostly on use, user rating and popularity with our customers.
TAP Stencils were created by Anna and Santi from JestPaint and have become one of the most popular stencil brands out there. When they first came out they were the only brand of stencil made to fit small faces and with a design flow specifically crafted so that you could use the entire stencil at once as a print rather than choosing which part of the stencil to work with. Their small size and very affordable price made them super popular!
The TAP Stencil Spider Web is a very popular stencil, not only to make a quick superhero face but also to use around Halloween time. It is a very nice stencil to have and it will come in handy more often than you might think:
10+ In Stock!
TAP 024 Face Painting Stencil - Spider Web
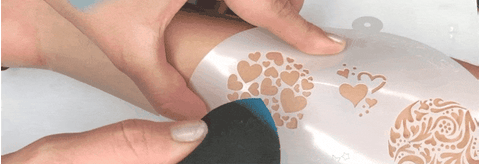
The TAP Stencil Hearts is one of our oldest stencils yet still a very popular one. It goes well with almost every design you paint! Princess crowns, eye designs, cute animal faces, Valentine's Day designs, etc. You need a heart stencil in your kit and this is one we strongly recommend:
10+ In Stock!


TAP 007 Face Painting Stencil - Hearts
Our TAP Stencil Animal Print is also very popular since it can be used for cheetahs, leopards, or even monster faces. You can move the stencil around the face as needed to add these spots to your design and make it a more exciting one!
10+ In Stock!


TAP 006 Face Painting Stencil - Animal Print
When the Disney movie Frozen hit the movie theaters a few years back this stencil became a super popular one, and it has remained a popular choice since then. Not only it can be used for designs inspired by the Snow Queen movie by Disney, but it can also be used for other winter-inspired designs and Christmas designs:
10+ In Stock!


TAP 015 Face Painting Stencil - Snowflakes
If you are looking to create scales, then the TAP Stencil Organic Scales is one of the best options we have, mostly if you are working with little faces. This stencil can be used to create scales for lizards, snakes, dragons, and monsters! It will likely become your most in-demand stencil:
10+ In Stock!


TAP 016 Face Painting Stencil - Organic Scales
Bad Ass Stencils are designed by Andrea O'Donnell and they were one of the first lines of stencils fully designed for face and body painters. This is likely the most popular brand of stencils out there and also the one with the largest selection, with designs meant for face painting and body painting.
You can never have too many stars in a design, so having a star stencil like the Bad Ass Stars stencil is a huge time saver! You can add stars to your princess crowns, one-eye designs, superhero-inspired designs, and more!
10+ In Stock!


Bad Ass Mini 1039 - Face Painting Stencil - Stars
The Dots stencil by Bad Ass Stencils became very popular around the time Marvel re-did some of their character's designs. This texture adds a great texture to your superhero inspired designs and it creates a 3D effect that will set your designs apart!
10+ In Stock!


Bad Ass Mini 1206 - Face Painting Stencil - Dots
It is hard to think of a butterfly face without seeing this stencil print on it. Bad Ass created a Hearts Swirl stencil that became super popular and made all butterfly wings extra special. This is for sure a must-have in your kit:
Very often you will find yourself having to paint floral designs, hippy-inspired designs, or spring-based designs. Having a stencil like the Bad Ass Daisies stencil can add a quick texture and make your design pop without having to do a lot of extra work with your brush:
4 In Stock!


Bad Ass Mini 2006 - Face Painting Stencil - Daisies
You can never have too many scales stencils in your kit, and it is really hard not to want to have at least 10 different ones. The Lizard Skin stencil by Bad Ass is one of our top choices because of how it plays with the different scale sizes, giving a 3D look to your designs. The large size allows you to stamp almost an entire forehead without moving the stencil at all.
10+ In Stock!


Bad Ass Mini 1004 - Face Painting Stencil - Lizard Skin
When Diva Stencils first hit the market, they came up with some amazing designs that were off the hook and never seen before! You really can't have a full stencil kit if you don't have at least some of her most popular designs.
Fairies are becoming more and more popular these days yet painting a small fairy on a moving child can be very complicated so having a stencil that can do that for you so that you can focus on the big details is great! This Fairy Diva Stencil is a really great option, you can even choose not to print the wings and free-hand the wings with a split cake to make them extra special:
10+ In Stock!


Diva Stencils | Face Painting Stencil | Fairy #8 (00001)
I think this is by far one of the most popular stencil textures I have seen. The Forehead Henna Bits stencil by Diva Stencils has become a very popular design. The fan-like shape can be used as a centerpiece or by the corner of the eyes to enhance your designs and give them a focus point:
5 In Stock!


Diva Stencils | Face Painting Stencil | Forehead Henna Bits (00648)
These days are almost impossible to go to a party and not get asked to face paint a unicorn. A few brands now have some great unicorn designs and this is a very popular one by Diva Stencils:
4 In Stock!


Diva Stencils | Face Painting Stencil | Demi Unicorn (333)
One of the newest brands of face painting stencils to hit the market was Boomerang Stencils by The Art Factory. These stencils have a very specific shape (a boomerang, of course) that is ideal since it fits the forehead and the side of the face perfectly. Place it with the inside of the boomerang towards an eye to create an eye design, or set it with the outer edge of the boomerang sitting in between the eyes to create a crown-like print.
Their most popular stencil by far is the Unicorn Horn Duo stencil since it has allowed face painters to paint unicorn horns perfectly every time, without making them look oddly shaped, lop-sided, too big, or too small.
Lea Selley has also created an amazing line of Graffiti inspired stencils that gave face painters the ability to create amazing graffiti looks with ease without compromising the results.
Her most popular stencil is the Ultimate Graffiti Eyes Stencil Kit, which comes with almost every design you need to make an out-of-this-world graffiti look:
A recently launched brand has become fairly popular due to its innovative approach to the stencil shape. They decided to start with a quarter moon-like shape that would perfectly fit on the forehead or by the eyes. This brand was created by Clayton James and since its creation, it now has dozens of designs to choose from.
One of the most Popular Ooh! Face Painting stencils are the Star Wrap. That is due to the fact that as we mentioned before, you can never have too many stars in one design so this will be a handy stencil more often than not:


![]()
![]()

Ooh! Face Painting Stencil | Star Wrap (W02)
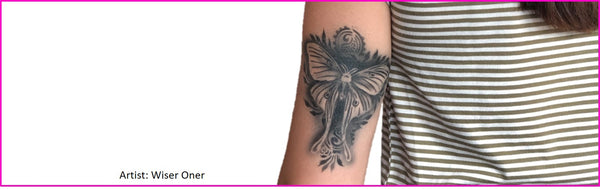
One of the most amazing airbrush artists in the face and body painting community, Wiser Oner, created a line of stencils that gives the illusion of real tattoos: Tattoo Pro. His line of stencils is extensive and you can find almost any theme you are looking for, but without a doubt, his most popular set is the Skulls set since it is one of the most popular fake tattoo designs out there. Painting with these stencils requires some practice, so we highly suggest you look for Wiser's free YouTube videos to make the most out of them.
3 In Stock!


Tattoo Pro 101 - Body Painting Stencil - Skulls
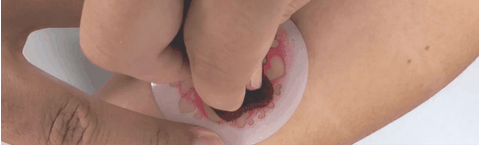
Donna Nowak, owner and creative mind behind ShowOffs Body Art created several lines of stencils that are worth taking a look at, but one stencil in particular has proven to be very popular throughout the years and this is her QuickEZ Teeth stencil. This stencil allows you to quickly paint teeth over the lips and mouth area, creating an instantly scary character without spending valuable time painting one tooth at a time.
8 In Stock!


QUICKEZ Stencil - TEETH
If you are curious as to what other stencils we carry and what other brands we have, please visit our All Face Painting Stencils by Brand page to see our entire selection.
And if you want to learn more about stencils you can visit this free blog post by Olga Murasev with more suggestions of great stencils for your kit: click here.
Also, if you want to learn more and take classes from pro artists we strongly recommend you subscribe to Olga's International Face Painting School. She is one of our partners and we know you will get very valuable training if you join her school.
Don't forget to leave us your comments below and read our related blog posts for more information!
Leave a comment