


Face Painting is very popular these days and it has expanded so much that not only kids enjoy it but adults to.
Learning how to face paint can be not just a fun activity to distract yourself and have fun with your kids, but also a money making skill that could help you support your family.
If you want to be a professional face painter or a would rather just do it as a hobby, it is important for you to learn how to face paint properly, using the right supplies, techniques and proper hygiene so that no matter what you can have fun and keep it safe.
In this blog post we will teach you the basic things you need to know to start face painting . Once you learn the basics, you can explore our blog post and learn all of the extra details that will help you turn into a pro.
The structure of this post is such that a complete beginner face painter can easily follow through and understand it all even if she or he has no previous knowledge or understanding on the subject.
We will start our beginner's face painting guide going over the basic face painting supplies you will need to learn how to face paint. This is not a professional set up, but rather a basic kit that will get you going.
We will then go over how to use your face painting supplies, including how to activate your face paints, how to properly load a brush and a sponge and how to use split cakes.
After that we will learn how to wash off face paint, how to clean your suppliers, how to store them properly and some safety and hygiene tips.
Once we have all of that down, we will teach you how to maintain your kit in good shape, and we will give you some fun practice tips so that you can continue to practice your face painting skills.
Lastly, we will provide you with some step by steps of the 10 most popular face painting designs for you to practice and finish learning how to face paint.
Note: this blog has been updated in 2023 to add extra information and links to newly developed products.
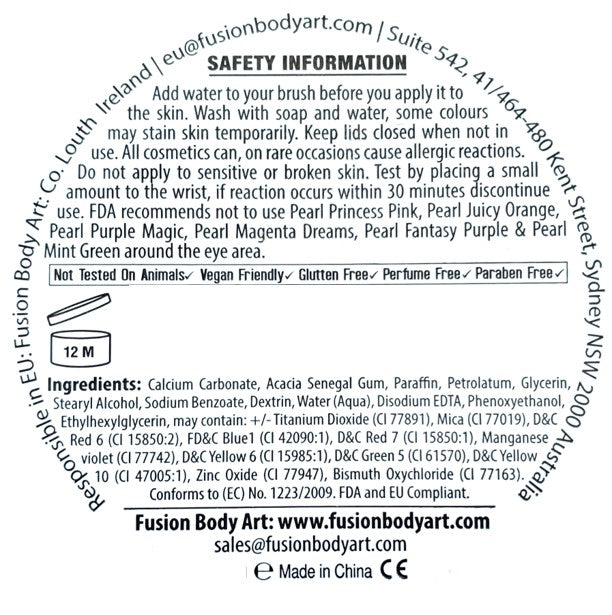
There are several kinds of face paints out there, water activated, dry pressed powders, liquid paints, grease base, wax based, glycerin based, etc. When you are just learning how to face paint we suggest you start with glycerin based face paints (like Superstar, Paradise) and/or paraffin wax or Acacia Senegal Gum based face paints (like Fusion Body Art, Diamond FX, TAG Body Art, Wolfe FX, etc). These paints are water activated, easy to use and provide good coverage and bold colors.
Paraffin Wax and Acacia Senegal Gum based face paints are specially good for line work, while glycerin based face paints are better for blending since they are more flexible and take a bit longer to dry on the skin.
If you want to learn all about the different kinds of face paints out there and what you can do with each of them, you should check our The Ultimate Face Paint Guide - Brands Comparison blog post.
I have several kinds of face paints on my kit since each one has a specific use, but my staple brands, the ones I used the most are Fusion Body Art and Superstar. - Anna Wilinski, Professional Face Painter.
To start your face painting journey you need to get the right supplies and you should always buy your face paints from a professional face paint store. There are many online professional face paint stores, and we run our own. With over 30 years of experience face painting professionally, we have first hand knowledge of the products we sell and we can recommend the best products for your needs.

We suggest you visit our store, www.JestPaint.com to see what we have to offer, but we will list below what we think is a good beginner face painting kit.
Here is a list of everything you need to get you started.
I. Beginner Face Painting Palette with the basic colors
Face paints come in three basic styles:


Superstar Face Paint | Aqua Face and Body Painting Palette - 6 BRIGHT Colours - DISCONTINUED
or
10+ In Stock!


Fusion Body Art | Sampler Face Painting Palette
Either one of those palettes is a good start, depending on your budget. They have the most basic face painting colors. With these you can paint almost any design you wish. Of course, they are small, so they are great for practicing, having fun and learning how to face paint, but if you decide to do this professionally, then you will need something larger.

When you are just starting out, the colors you should for sure have are:
You will notice that you will use black and white the most since almost every design uses black and or white, so you might want to get larger containers of them, like these ones:
10+ In Stock!


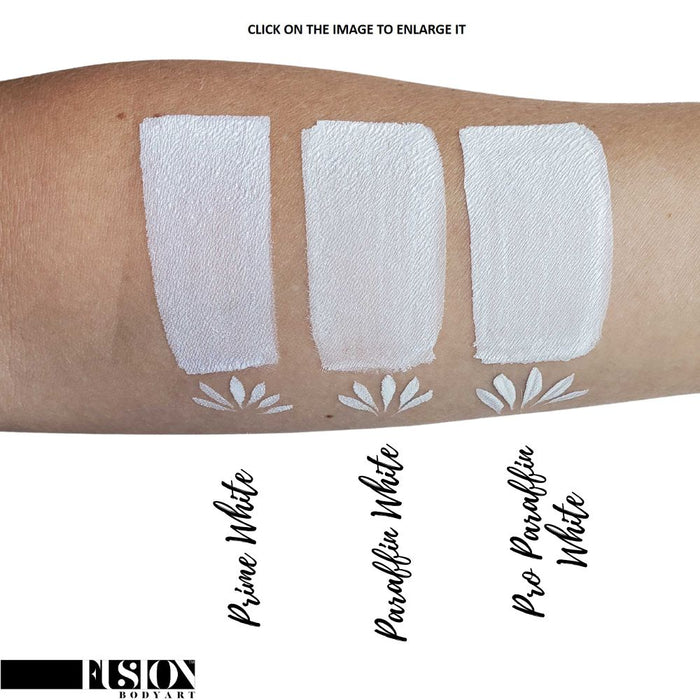


Fusion Body Art Face Paint | Prime Paraffin White 32gr
10+ In Stock!

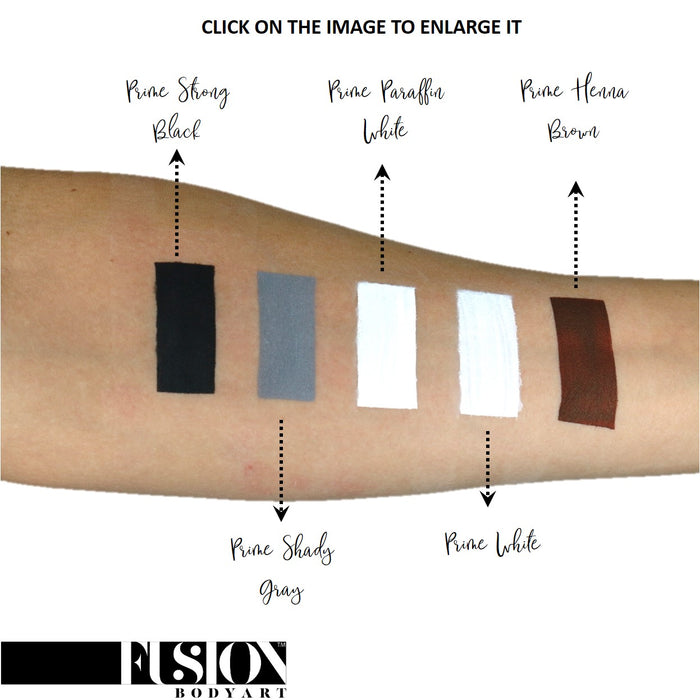
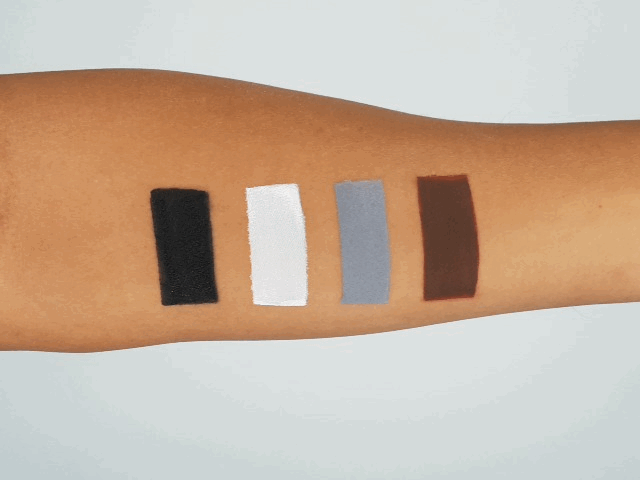
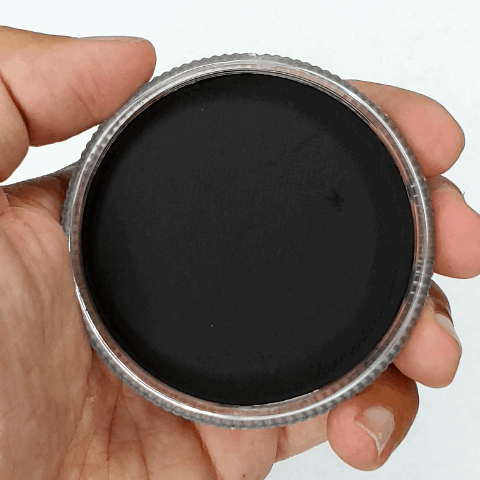
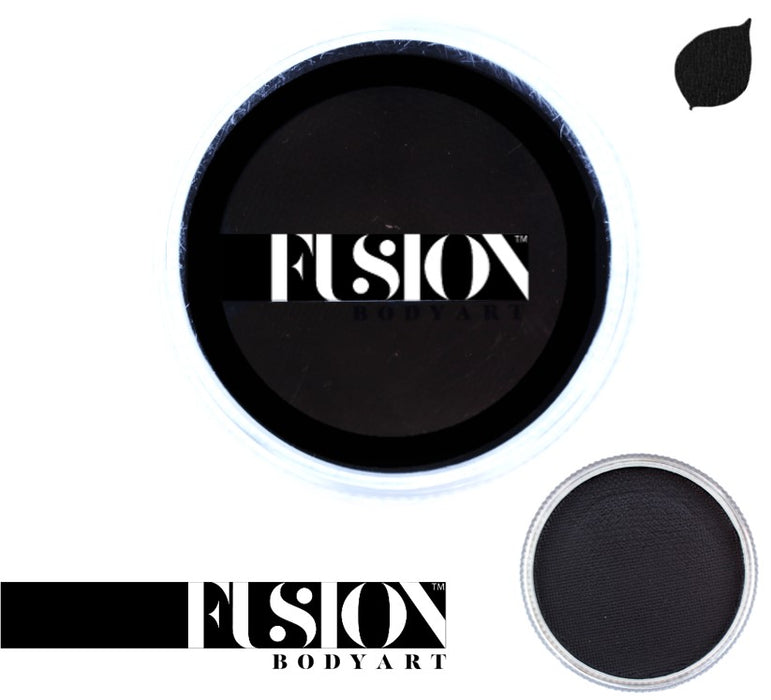

Fusion Body Art Face Paint | Prime Strong Black 32gr
II. Face Painting Brushes
We have designed Bolt Brushes with face painters in mind. We created brushes with a medium bounce, an easy to grab handle and the right length to give control over your brush strokes. You will discover with time that different painters like different brushes but this set will get you started and has the brushes you need for line work (pointy round brushes) and to use with split cakes (flat brushes):
Your basic brush shapes are:

III. Face Painting Sponges
Most of your base work (when you lay down colors to create a base for your design) will be done using sponges. Face Painting sponges are designed to be oft to the touch yet firm enough to activate the paint.
I keep over 50 sponges on my sponge bag at any given event, and usually carry at least two kind of sponges: half circle and petal shape.
You can get started with just a simple set of half circle sponges, later on you can add specialty shape sponges, but for now, when you are just starting to learn how to face paint, this set will do it:

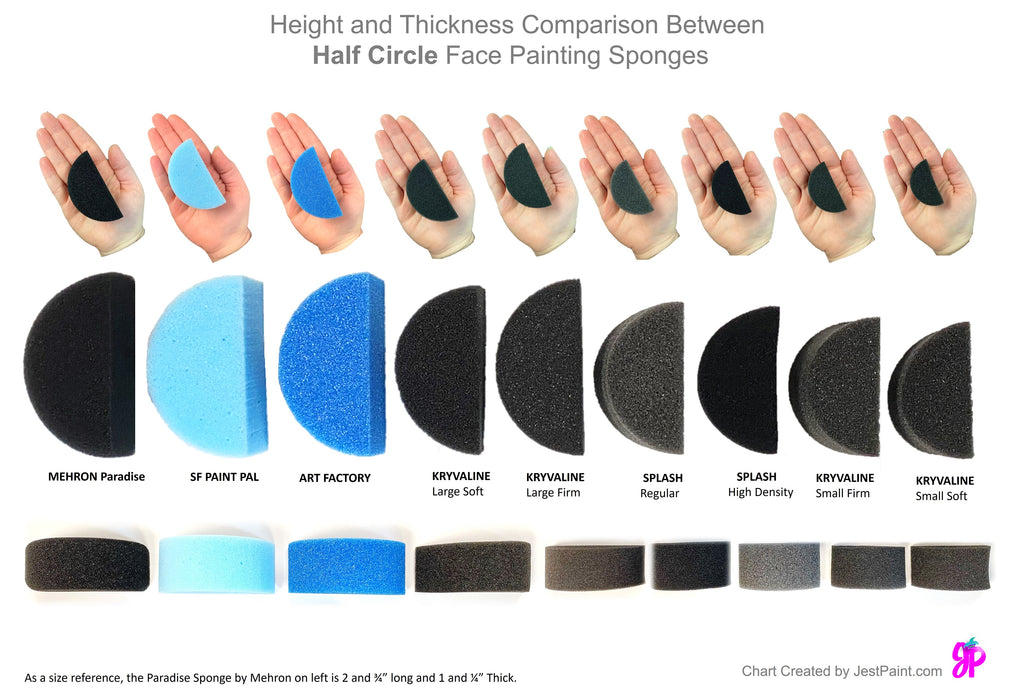
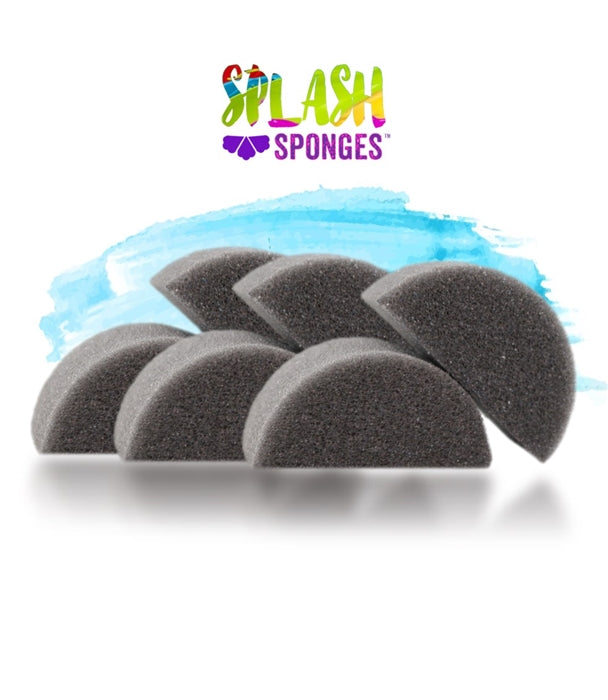


Splash Face Painting Sponges by Jest Paint | HALF MOON (6 pieces) - DISCONTINUED
Sponges come in a few different shapes, here is a list of the 3 most common ones:

IV. Cosmetic Grade Glitter
No face painting kit is complete, even for a beginner without some GLITTER! Glitter can make any face paint design extra fancy if you use it right. For those starting to learn how to face paint they might feel like the more glitter the better but that is not the case. With glitter is all about using the right amount on the right places. Too much glitter can make your design blurry. Too little and it might not pop as much as you hope it would.

There are many kinds of glitter out there, we will cover some of the basics:

Now that we have covered the main forms in which you will find glitter we can discuss what kinds of fine loose glitter and chunky glitter exist:

V. Practice Board
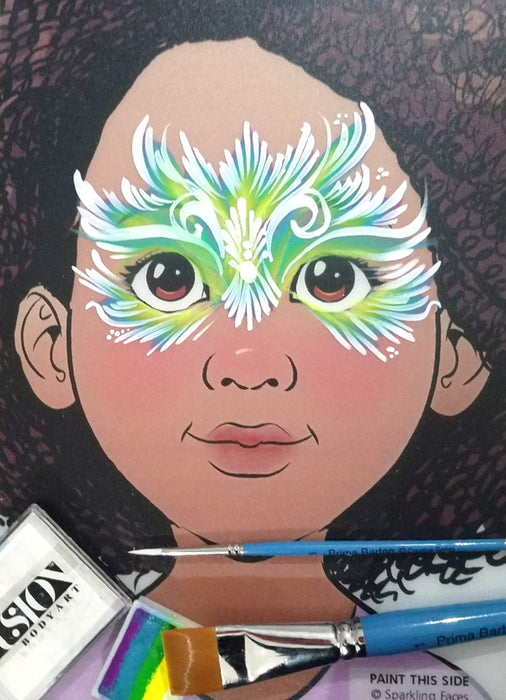
In order to learn how to face paint you will need to practice, and sometimes it can be hard to find someone to practice on, so we suggest you get a practice board.
There are several kinds of face painting practice boards out there, the ultimate rage are the colored ones. Although the proportions on these boards are not 100% realistic, the texture is not the same as skin, and you are missing the 3D factor, if you have no one to practice on, this is your second best option. They are super easy to wash off and you can take pictures of your designs and create incredible looking design boards for your clients to look at.
4 In Stock!


Sparkling Faces | Face Painting Practice Board - Leo
You can also practice on your arms and legs, but eventually you will need a face to paint on. With a little bit of extra practice, you can face paint your own face.
VI. Water Bucket
You don't need to get anything too fancy since it is just meant to rinse your brushes and sponges. We suggest something wide so it is stable and not too deep since you don't want the water level to be above the brushes ferrule.
If you can't find anything suitable, here is a good option:
This is a particularly great system since it allows you to have clean water every time, and hides the dirty water in a reservoir below.
VII. Brush Holder
Brush holders are designed to protect your face painting brushes while in storage, and to give you an easy an organized access to your brushes while face painting. We highly suggest you get one since it will help you protect your brushes and keep them in good shape for a longer period of time.
There are several great options out there, this is the one we use the most:
VIII. Baby Wipes
Baby wipes are just one option, not always the most eco friendly, but it is the most practical sometimes. We use baby wipes to clean the face or wipe the boards when access to a sponge, soap and water is not easy.
Keep in mind that if you use baby wipes on skin they should be unscented to reduce the changes of allergic reactions, and that they should never be used to clean the surface of your face paints since they can leave little fibers on your face paint cakes.
If you are at home, practicing, it best to just use a face painting sponge with some soap and water to clean the practice board or the skin.
VIII. Stencils
Stencils are great tools but they do require some practicing as they have a longer learning curve than plain face painting. There are many shapes and sizes of face painting stencils and you will discover that some are better suited for body painting, some for a full face design and some just for accents. Most face painting stencils are made from a thin reusable plastic called Mylar and they flexible enough to bend around the face or body as needed.

If you are just getting started we suggest you first get your basic face painting techniques under control and only then you move onto stencils.
If you want to learn all about face painting with stencils we suggest you visit our Face Painting with Stencils - Instructions and Best Stencils Guide and get practicing!
Above are fast and fun designs done with Ooh Body Art Stencils!
IX. Split Cakes
We left the split cakes at the end of the list because these do require some extra practice and might not be the best way to get you started. Split cakes are fun and can help you create amazing designs with just a few strokes, but they require for you to have a clear understanding of how to properly load your brush and or sponges, and to be proficient in brush and sponge use.

Split cakes come in a few sizes but the most common ones are the 50gr and 30gr split cakes.

If you want to see our full range of split cakes you can find them here: All Face Painting Split Cakes.
A. How to Activate your Face Paints with a Sponge and with a Brush
Activating your face paints is easy. We are going to focus on water activated face paints. All you need is just some water and a face painting brush or sponge.
For sponges, get the tip of your sponge wet, just the tip, and then rub the sponge back and forward or in a circular motion over the surface of the face paint cake until you see that the consistency of the paint is creamy and the tip of your sponge has a good load.

For brushes simply get the entire bristle area of your brush wet, wipe excess water against the edge of the water container and move the brush gently over the face paint cake to activate the face paint. The consistency should be creamy and you should notice that the brush has a good load of paint before you can use it.
B. How to Activate Rainbow and Split Cakes
Activating split cakes is as easy as activating regular solid colors, but you have to keep in mind that because you have stripes of colors, you can't swirl your brush or sponge around, the movement should always be back and forward in the direction of the stripes, and you should always re load them making sure the original colors align (between your sponge or brush and the cake).

Also, if you hold your split cake in such way the the stripes are running vertically (top to bottom), any excess water can go down the stripe without mixing the colors on your cake. If instead, while you hold it the stripes are horizontal to the ground, then any excess water will run through the stripes making your split cake muddy.
C. How to Load your Face Painting Brushes and Sponges.
One thing is to activate and a different thing is to get a proper load to face paint successfully.
When working with face painting sponges always make sure to only dip the very tip of your sponge. Water will clime up your sponge anyhow. If you get too much water on your sponge make sure you firmly squeeze all extra water off your sponge before you start to load the face paint. Once you feel the amount of water is right, then you can start rubbing the sponge back and forward or in a circular motion until you notice that the paint has a creamy consistency and that the tip of your sponge is fully loaded. Then, test the paint on your arm to make sure is not runny. If the paint comes out nice and creamy and the coverage is opaque, then you are good to go! If it feels slightly dry and you are having a hard time getting paint off the sponge, add a bit more water to the tip of your sponge and repeat the steps above.

When working with face painting brushes make sure to get the full length of the bristles wet, but avoid getting water in between the ferrule and the handle or your handle might start to come loose eventually.
Once the bristles are wet, wipe any excess water on the edge of the water container and proceed to rub the brush against the surface of the face paint cake in circular motions if it is a round brush or back and forward if it is a flat brush. Once the paint has a creamy consistency, wipe the edge of your brush against the edge of the face paint container to remove any excess paint and test on your arm. If it is too runny then go back to your face paint cake and continue to activate the paint, this will allow the extra water to mix in with the paint. If it is too dry, then dip the tip of your brush again in water and re load. Test again and then start painting.
D. How to do basic sponge techniques:
Using face painting sponges is easy once you have practiced a few times. You can use sponges to lay down a base and to blend colors. There are other sponge techniques like stippling, and drawing with the edge of the sponge, but that requires a more advance technique that we won't cover right now.
I. Laying down a base
To lay down a base simply load your sponge as explained above and gently pat the sponge against the skin until you get the desired coverage. You will need to think of the shape of your design before you start laying down a base. If it is a tiger, a butterfly, a super hero, etc. Depending on the design you wish to paint the base shape will be different. This is a little different than how we are used to painting when we are kids, because we are used to fill in the lines. Here, we lay down the base first and then we outline the design, so don't feel frustrated if at first this looks complicated, it is a matter of re training your brain.

At the beginning, you can gently draw an outline in white so that you have an easier time laying down the base afterwards. This is just to use it as a guide until you get the muscle memory to paint a base without any guidelines.
You can also lay down a base using a kabuki brush or a flat brush. We will go over using a flat brush with the 1 stroke technique below. But as of right now using a sponge is a great way to get started.
II. Blending Colors
Blending colors is fairly easy. Your best option is to work with glycerin based face paints like Superstar or Paradise since those are a bit easier to blend given that they take longer to dry.

You can either load a color on your sponge, and then load the other one right next to the first one so that both colors are loaded on your sponge at the same time and you paint the face with both colors at once, or, you can first load one color, apply it to the face and then load a second color with a new sponge (or rinse the first one and re load) and apply it on the face as well, bl;ending both colors in the middle by gently patting the sponge over the edge of the first color until you get an even and soft blended look.
If you use a rainbow cake and a sponge, you can easily load 2 or more colors at once and get a perfect blend without much effort.
E. How to do Basic Brush Stroke Techniques
Now that you got your sponges under control is time to master your face painting brushes. Think of your brushes us your pens, is what you use to draw your design, to give it details, to outline. But, there are many brushes out there, and some won't actually work for outlining but instead of creating shapes, or loading specific kinds of face paints. Lets go over the different things you can do with face painting brushes so that you can learn how to face paint.
I. How to outline
Outlining is the second part of most face paint designs. When you are learning how to face paint this can be the more challenging time if you don't have an art background but with patience and practice you will get better quickly. I suggest you start by choosing a simple design like the ones we have at the end of this post and try those before you go for something more complicated.
When you grab a brush for the first time there is a few exercises you want to try:

These simple exercises will teach you brush control. Then you can start to copy simple designs, like a heart, a star, a flower, just to test your wrist moves. Although at first you will be tempted to focus your sight on the end of the brush, you will get better results if you focus on where you want you brush to go to rather than where your brush is at all times.
II. How to Paint Teardrops
Teardrops are a face painter's best friend! They can make almost any design look better, but they are not so easy to master, so have a bit of patience while you work on them. We all started with really terrible looking teardrops, but you can master them, I promise!
You have to start with a round brush, better if it is one that is not super pointy.
First thing is to know that you can either do them from head to tail or from tail to head, and there isn't a correct way, either one is fine, it all depends on what is easier for you. If you brush is too pointy though, it is best to go from tail to head otherwise the head (rounded) part of the teardrop will have a small tip as well.

If you want to do the ones that go from tail to head, you have to think of your brush as a landing airplane, the very tip of the brush lands first and as you move your hand forward you start pressing down until the entire brush has landed. Once the part of the bristles that are closer to the ferrule have touched the skin, you will have a teardrop. You will need to practice this a few times before you can master them.
If you want to them in reverse, you will start by pressing down the entire brush against the skin, gently but firmly, and then you will slowly pick up the brush while dragging the tip a bit farther in the same direction in which you are picking the brush so to create the tail of the teardrop. So, the very end of your brush will be dragged across the head of the teardrop to create the tail.
Notice that most of the time teardrops are added to a design in uneven numbers, meaning in groups of three or five, this creates symmetry. When you do that, make sure that the you either make the teardrop in the middle the longest and the ones on the side smaller, or you make the first one larger and the ones underneath smaller and smaller, or the opposite, the first one smaller and the ones underneath larger and larger. Just don't do them all the same size or they will look odd.
III. How to do Thin to Thick Lines
Doing line work to outline your designs is very important, and because line work is such an important part of your design it is also important for it to flow and look nice. One of the best techniques you can use to make your designs more interesting is to you use lines that vary in thickness, so they can start thin, then go thicker and then go back to being thin. To do that you simply just change the amount of pressure you put on the brush, for thin lines try and put very little pressure on your brush and use just the tip of it; for thick lines put more pressure on your brush so a larger part of the bristles is pressed against the skin as you drag the brush.

You can do this with a round brush, or a 1/2" flat brush, a dagger brush or even a script liner brush, but we highly suggest you practice first using a simple round brush, maybe a number 3 or a number 4 until you can dominate the technique.
IV. How to do Starbursts
Starburst can be challenging for those that are just starting to learn how to face paint but with a lit of practice you should be able to do them fast.

Choose a thin round brush, maybe a #2 round with a sharp point. You will start your starburst from the center out. Load your face paint brush with some white face paint, a light load, and then gently press the tip of your brush and drag it out just about 1/4". Repeat that same movement, starting from the center out 5 times following the normal shape of a star and you will have your starburst.
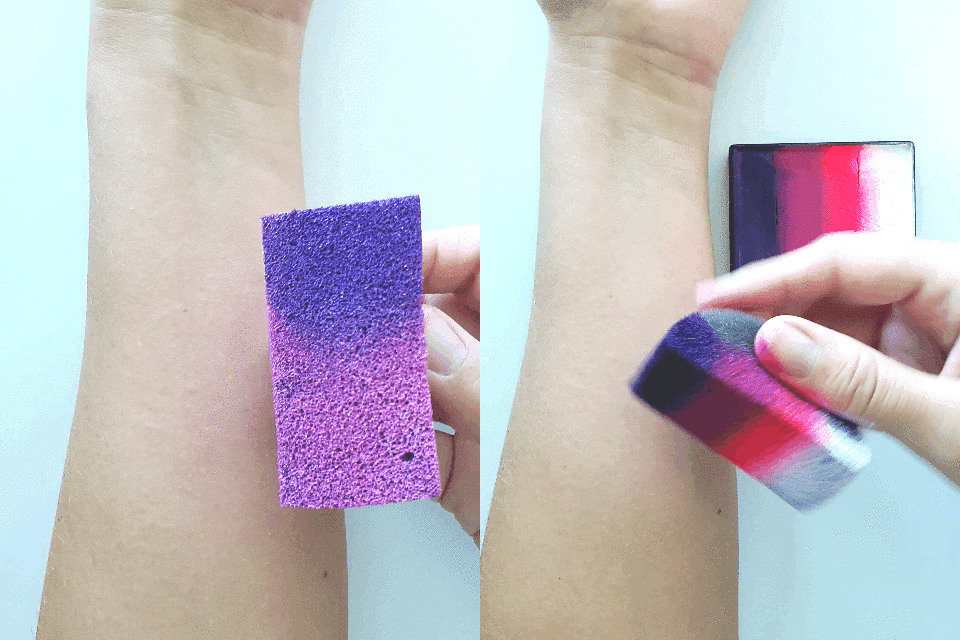
V. How to Paint with Split Cakes
Face Painting with split cakes is likely one of the most exciting things about face painting. You can literally see a rainbow flow of your brush like magic! You will be jumping on one foot once you have control over it.
Start by graving a 3/4" flat brush and getting it nice and wet, and then rinse the excess water against the edge of your water container. Then, grab your split cake vertically so that the stripes are running up and down and start moving your flat brush across the cake, up and down until the brush has a full load. If you see that the brush is dripping water, go back to the edge of you water cup and scrape the brush so to remove that excess water and then go back to your cake. So long you hold your cake vertically, the colors won't get muddy. Once the paint is creamy and the brush looks fully loaded, test the paint on your hand to make sure is not runny. If it is, you can tap the tip of your brush against a paper towel to absorb the extra water, or keep loading the brush on the cake until the face paint is creamier.

Now is time to paint, start by gently pressing the brush against the skin and move it up, or down or sideways depending on the direction you want to go. You can practice for example starting with the brush right at the corner of the eye and making a curve around the eye towards the eyebrow. In this case you want to start with the edge of your brush press against the skin like if the brush is standing, and then rotating it so the full surface of the brush presses against the skin as you drag the brush up.
Once you have practice enough you will be able to paint leafs, flowers, ribbons and even full face designs with them. Please download the practice sheet below and print it. Put a piece of acetate on top and practice the strokes
VI. How to Use a Petal or Flower Brush
Petal or flower brushes are a really fun tool, even for those who are just starting to learn how to face paint. I highly suggest you get one and play with it, you will be so glad you did!
Usually we like to load these brushes with two colors. We start by loading the brush with a light color, like white, all the way from tip to the end of it, just like you would with a round brush. Then, we get the very tip of it slightly wet and load a darker color, like red, or blue, but just on the very tip.

Once you have it loaded, press it from the tip down against the skin until it leaves a stamp that looks like a petal. The more you press the wider the petal will be. Now go around using the same center point and do five petals around that center point, equally spaced, and you will have a very nice flower.
It takes a little bit of practice to get all of the petals with an even size, but you will get it. You can buy larger and smaller petal brushes to create different size flowers, or just work with the pressure on your brush.
VII. Strokes you can do with Different Brushes (round, script liner, flat, filbert, angle, petal).
Because it is easier to see it than to explain it with words we have created a few GIFS so that you can take a look at the different brush strokes that you can do with different brushes.
Round Brush

Flat

Filbert

Angle

Petal

F. How to Use Your Face Painting Stencils
Using face painting stencils requires a bit of practice, and we have an entire blog post written about it: Face Painting with Stencils - Instructions and Best Stencils Guide but the basic idea is that you should press the stencil firmly against dry skin (make sure there is no wet paint underneath) and then using an almost dry sponge or kabuki brush you paint over the surface of the stencil gently until you have covered the desired area. Always test your sponge or brush on your skin before stenciling to make sure it is almost dry, If it is too wet the paint will bleed under the stencil.

G. How to Use Face Painting Glitter
When using glitter remember that glitter should enhance your designs, not over power it. If you are going to sprinkle glitter over your design we suggest you do it BEFORE you do the outline. That way the glitter won't make the outline blurry.
If you are going to add glitter creams or gels, you can do it as a final step, always making sure not to activate the paint so your design is not ruined.
You can use the fine glitter gels with the plastic tip to outline your design as a different option.
Whatever you choose, if you work with loose glitter have your customers close their eyes before you put the glitter on and make sure you don't use chunky glitter in the immediate eye area to prevent it from getting into the eye.
Keeping your face painting clean is very important, not only so that you can paint better but also to protect your supplies and make them last longer. On top of that, if you are going to paint the general public, keeping your face painting kit clean protects you from spreading diseases among your customers.
A lot can be said about this and we have written and entire blog post about.
Please read our Top 10 Safety and Hygiene Tips for Face Painting - The Ultimate Guide to get a full list of things you should do to have a clean and sanitary operation.
Here is a list of basic things you should know:
I. Always Clean your Kit After Using it: wipe the surface of your cakes with a clean sponge and clean water and let them dry. Don't use baby wipes or they will leave fibers stuck to your cakes. Only put the lids on your cakes once they are fully dry.
II. Wash your brushes: use some brush soap and was your brushes well, rinse them fully and let them dry either hanging upside down or laying down on top of a towel. Never store them standing up while they are still wet or the water will go down the bristles into the ferrule and loosen the glue that holds the brush together.

III. Wash your sponges: soak your sponges with soap, wash them really well and then you can put them in the dryer so they can fully dry fast and not be left out moist to dry slowly.
IV. Never paint over broken or damaged skin: in order to avoid spreading diseases you should always paint over healthy and clean skin.
V. Use only one sponge per child and clean your brush well in between uses: not every face painter uses the same practices, but what we consider the safest practice is to only use one sponge per child, never re load the same sponge, use one brush per child and never reload. Sponges you can have hundreds, they are cheap, use one per load and then toss them in a sponge back to clean them later. Brushes, you can have several of each kind, and after each use rinse them well, spray them with 70% alcohol and let them dry out completely before using them again. You can store all of your face painting sponges in a Sponge Mesh Bag.
VI. Wash your hands: keeping your hands clean and cleaning them in between customers will help you stay healthy and prevent passing any disease to others.
VII. Always use the right products: as we mentioned above, using the right face painting supplies is important. Never use acrylics or tempera, never use craft glitter, avoid scented baby wipes or any other products that has not been designs and tested for regular skin use.
Taking care of your face painting kit is the key to make it last and save money. You have learned above how to take care of your face paint cakes, we will now go over a few tips in regards to keeping your brushes in good shape.
We have written a more extensive blog on brush care. You can read our How to Take Care of your Face Painting Brushes | Brush Repair Tips blog post to get a full understanding of all of the hings that you can do to keep your brushes like new.
Here are a few basic things you should keep in mind:
A. Never dip your brushes in water past the bristles: if the water gets over the ferrule, by where the ferrule meets the handle, you can get water in between the ferrule and the brush handle and this will end up loosening the glue that holds the brush together and your brush will eventually fall apart.

B. Never leave your brushes standing on the bristles: when you are painting, make sure you rinse your brushes well and leave them resting on a paper or cloth towel, or standing up with the bristles up so that the bristles are not bent by the pressure.
C. Load your brushes carefully: when loading your brushes make sure you do it gently, if you press your round brushes harshly against the cake instead of doing gentle circular motions, you will end up hurting the brush.
D. Store your brushes in a protective case: when you are done painting nd your brushes are clean and dry, make sure to store them in a protective case so that the bristles are protected from any item that could damage them.
E. Never leave your kit in an area that is too hot, too humid or too cold: your face paints are sensitive to temperature, light and humidity. Your kit should be stored in a cool, dry and dark place, and it should never be left inside a car or under direct sun light or exposed to the elements (like in a porch). Face paints can melt, they can freeze and they can get super soft and moldy under the wrong conditions.
F. Keep and eye on your stock: a week or two before any gig, look at your stock and make sure you have all of the supplies you need. If you don't, place your order online (www.JestPaint.com) so that you can have everything you need on time for your job.
One of the most important things you can do to get good at anything is: have the right tools and PRACTICE! Practicing your skills, getting new ideas and testing new designs are a key part of learning how to face paint.
We strongly suggest you get a practice board so that you can practice as many times as needed. You can even get a few, at least a side view one and a front view one so that you can practice one eye designs and full face designs.
It is best if you can set a day and time during the week that you commit yourself to practice. This is your time. Set a small space in your house where you know you will have the peace you need, and commit to practice at least once a week. If you can do it more often, even better!
You can use this blog as inspiration for deigns to practice, you can use YouTube or you can join the International Face Painting School if you want to take a professional course.
A. Frozen Anything

B. Spiderman, Batman and other super heroes

C. Princess crowns

D. Butterfly, usually butterfly wings around the eyes

E. Rainbows, usually across the forehead with clouds at the ends, or from the corner of the eye into the forehead.

F. Tiger, Lion, Cat Face or any other cat like animal.

G. Mermaid Crowns or check art mermaids.

H. Floral designs.

I. Unicorn: either a full face unicorn with ears and horn, or a check art unicorn.

J. Dogs, puppies

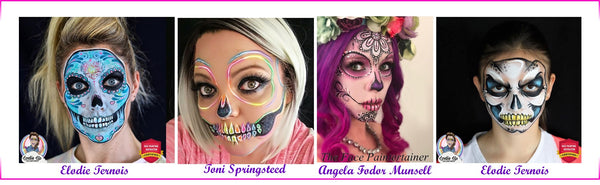
K. Skulls, including sugar skulls around Halloween
L. Dragons, Lizards and other lizard like monsters

M. Dinosaurs (specially if you are at a dinosaur show)

N. Zombies

This Halloween Cat Design will be a hit this year. It has a cute witch hat and doesn't have a lot of paint around the mouth. The Simple Skull will also be a great hit. You can make it more boxy so that it looks like a Minecraft Skeleton as well.
O. Halloween Cat Face

P. Simple Skull

In order to remove the face paint you should follow these simple steps:
If you really like face painting, then you should look into turning it into a business. It can be a nice source of income and a fun job!
If you want to learn all about getting your face painting business going, you should read our How to Start and Run a Face Painting Business - The Complete Guide, it is the most complete face painting business guide out there and it is 100% FREE.
If you like this blog post, please leave a comment below, subscribe using the box right underneath the post and share it with your friends. Also, feel free to browse around and read our other helpful posts and check our huge collection of face painting supplies.

Comments
Leave a comment